
Install P1-Reader on ESPHome in Home Assistant
Jag har utgått från informationen som finns här.
Installera ESPHome
Först måste Home Assistant (HA) vara installerat eller så måste du köra ESPHome någonstans. För att installera ESPHome i HA så gå till Settings -> Add-ons -> Add-ons store
Välj ESPHome bland alla Add-ons och på nästa sida install
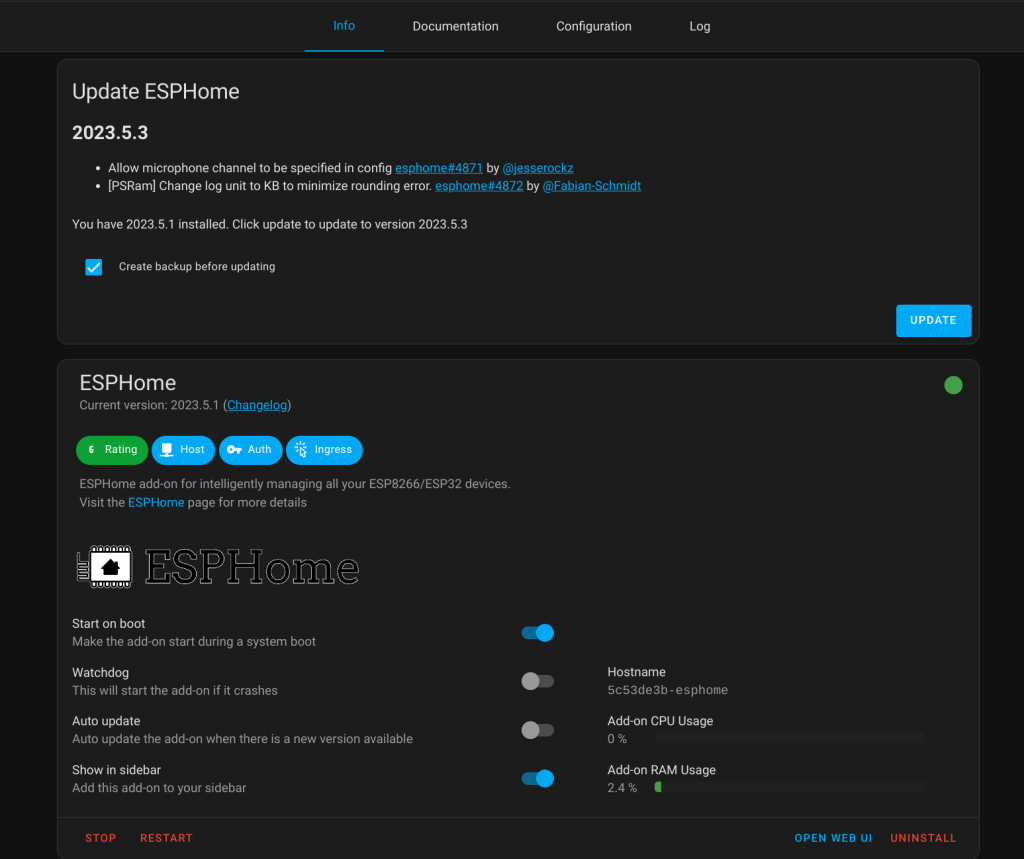
När du installerat det borde det se ut såhär när allt kör som det ska.
Generera firmware fil
För att kunna läsa ut datan så måste vi koppla en extra fil till ESPHome för att kunna få ut våran extra data som skickas från elmätaren. Denna fil kommer att kompileras med allt annat. Allt detta sker automatiskt i ESPHome.
För att ladda upp filen behöver vi installera ett add-on till. Det heter “File editor” och ligger under Official add-ons. Öppna sedan File editor.
Nu behöver du ladda ner denna filen. Den ska sparas ner och måste heta p1reader.h.
Längst upp till höger i HA på File editor finns en ikon som ser ut som en katalog. Klicka på den och leta reda efter esphome katalogen. Klicka sedan på pilen som pekar uppåt för att ladda upp p1reader.h i denna katalogen.
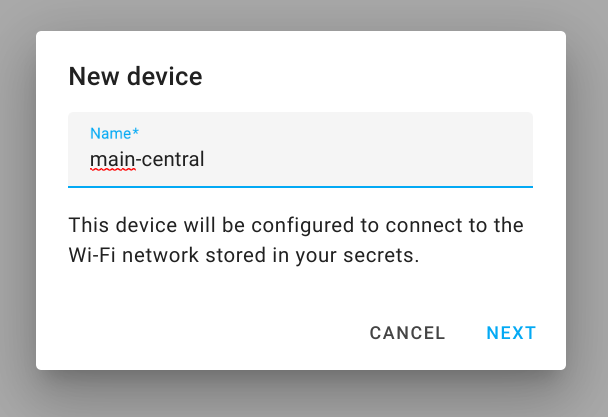
Nu ska du gå till ESPHome i vänstermenyn. Längst ner till höger finns en grön knapp för att lägga till en ny enhet. Välj ett bra namn för enheten och välj nästa.
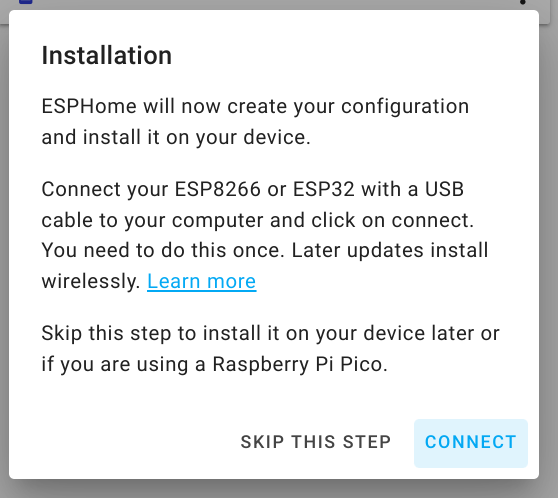
Välj att skippa nästa dialog.
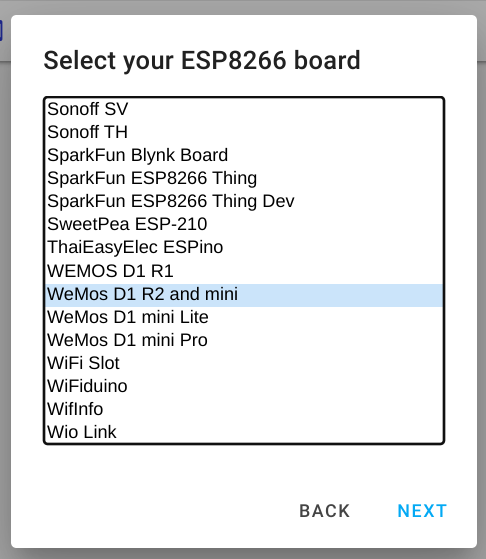
Checka ur Use recommended settings och välj sedan ESP8266
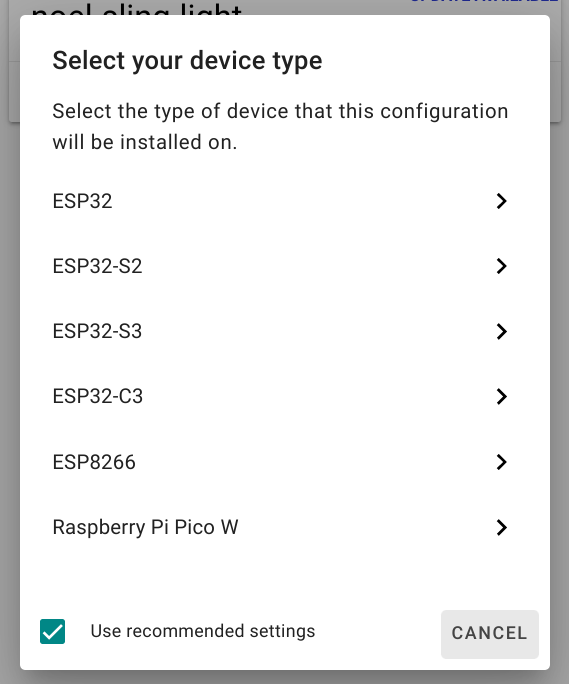
Scrolla ner och välj “WeMos D1 R2 and mini”
Skippa nästa steg eftersom vi kommer ladda upp filen istället för att använda en kabel. Det går lika bra att ta ut ESPn och använda en kabel om man vill det.
Nu måste man editera den nya integrationen så den kan läsa av datan från el-centralen. Klicka på Edit på den nya ESP devicen som vi har lagt upp. Det finns två delar man behöver göra. Dels behöver man lägga till en länk till sin fil som vi laddade upp och dels behöver vi lägga till vart signalen från el-centralen kommer in till enheten. Kopiera in de delarna som anges med kommentarer här under. Det ska vara två ställen.
esphome:
  name: main-central
  friendly_name: main-central
  # ADD THIS TWO LINES
  includes:
  - p1reader.h

esp8266:
  board: d1_mini

# Enable logging
logger:

# Enable Home Assistant API
api:
  encryption:
    key: "jdd6724cbry4aCk+SKslMIYdGTTYzH9I/R4hBVbcqXQ="

ota:
  password: "725c86cd0e43211461c7279a695736eb"

wifi:
  ssid: !secret wifi_ssid
  password: !secret wifi_password

  # Enable fallback hotspot (captive portal) in case wifi connection fails
  ap:
    ssid: "Main-Central Fallback Hotspot"
    password: "7VnbsQjkliMI"

captive_portal:

# ------ ADD EVERYTHING UNDER THIS COMMENT -------
uart:
  id: uart_bus
  rx_pin:
      number: 3
  baud_rate: 115200

sensor:
- platform: custom
  lambda: |-
    auto meter_sensor = new P1Reader(id(uart_bus));
    App.register_component(meter_sensor);
    return {
      meter_sensor->cumulativeActiveImport,
      meter_sensor->cumulativeActiveExport,
      meter_sensor->cumulativeReactiveImport,
      meter_sensor->cumulativeReactiveExport,
      meter_sensor->momentaryActiveImport,
      meter_sensor->momentaryActiveExport,
      meter_sensor->momentaryReactiveImport,
      meter_sensor->momentaryReactiveExport,
      meter_sensor->momentaryActiveImportL1,
      meter_sensor->momentaryActiveExportL1,
      meter_sensor->momentaryActiveImportL2,
      meter_sensor->momentaryActiveExportL2,
      meter_sensor->momentaryActiveImportL3,
      meter_sensor->momentaryActiveExportL3,
      meter_sensor->momentaryReactiveImportL1,
      meter_sensor->momentaryReactiveExportL1,
      meter_sensor->momentaryReactiveImportL2,
      meter_sensor->momentaryReactiveExportL2,
      meter_sensor->momentaryReactiveImportL3,
      meter_sensor->momentaryReactiveExportL3,
      meter_sensor->voltageL1,
      meter_sensor->voltageL2,
      meter_sensor->voltageL3,
      meter_sensor->currentL1,
      meter_sensor->currentL2,
      meter_sensor->currentL3
    };
  sensors:
  - name: "Cumulative Active Import"
    unit_of_measurement: kWh
    accuracy_decimals: 3
    state_class: "total_increasing"
    device_class: "energy"
  - name: "Cumulative Active Export"
    unit_of_measurement: kWh
    accuracy_decimals: 3
    state_class: "total_increasing"
    device_class: "energy"
  - name: "Cumulative Reactive Import"
    unit_of_measurement: kvarh
    accuracy_decimals: 3
  - name: "Cumulative Reactive Export"
    unit_of_measurement: kvarh
    accuracy_decimals: 3
  - name: "Momentary Active Import"
    unit_of_measurement: kW
    accuracy_decimals: 3
    state_class: "measurement"
    device_class: "power"
  - name: "Momentary Active Export"
    unit_of_measurement: kW
    accuracy_decimals: 3
    state_class: "measurement"
    device_class: "power"
  - name: "Momentary Reactive Import"
    unit_of_measurement: kvar
    accuracy_decimals: 3
  - name: "Momentary Reactive Export"
    unit_of_measurement: kvar
    accuracy_decimals: 3
  - name: "Momentary Active Import Phase 1"
    unit_of_measurement: kW
    accuracy_decimals: 3
    state_class: "measurement"
    device_class: "power"
  - name: "Momentary Active Export Phase 1"
    unit_of_measurement: kW
    accuracy_decimals: 3
    state_class: "measurement"
    device_class: "power"
  - name: "Momentary Active Import Phase 2"
    unit_of_measurement: kW
    accuracy_decimals: 3
    state_class: "measurement"
    device_class: "power"
  - name: "Momentary Active Export Phase 2"
    unit_of_measurement: kW
    accuracy_decimals: 3
    state_class: "measurement"
    device_class: "power"
  - name: "Momentary Active Import Phase 3"
    unit_of_measurement: kW
    accuracy_decimals: 3
    state_class: "measurement"
    device_class: "power"
  - name: "Momentary Active Export Phase 3"
    unit_of_measurement: kW
    accuracy_decimals: 3
    state_class: "measurement"
    device_class: "power"
  - name: "Momentary Reactive Import Phase 1"
    unit_of_measurement: kvar
    accuracy_decimals: 3
  - name: "Momentary Reactive Export Phase 1"
    unit_of_measurement: kvar
    accuracy_decimals: 3
  - name: "Momentary Reactive Import Phase 2"
    unit_of_measurement: kvar
    accuracy_decimals: 3
  - name: "Momentary Reactive Export Phase 2"
    unit_of_measurement: kvar
    accuracy_decimals: 3
  - name: "Momentary Reactive Import Phase 3"
    unit_of_measurement: kvar
    accuracy_decimals: 3
  - name: "Momentary Reactive Export Phase 3"
    unit_of_measurement: kvar
    accuracy_decimals: 3
  - name: "Voltage Phase 1"
    unit_of_measurement: V
    accuracy_decimals: 3
    state_class: "measurement"
    device_class: "voltage"
  - name: "Voltage Phase 2"
    unit_of_measurement: V
    accuracy_decimals: 3
    state_class: "measurement"
    device_class: "voltage"
  - name: "Voltage Phase 3"
    unit_of_measurement: V
    accuracy_decimals: 3
    state_class: "measurement"
    device_class: "voltage"
  - name: "Current Phase 1"
    unit_of_measurement: A
    accuracy_decimals: 3
    state_class: "measurement"
    device_class: "current"
  - name: "Current Phase 2"
    unit_of_measurement: A
    accuracy_decimals: 3
    state_class: "measurement"
    device_class: "current"
  - name: "Current Phase 3"
    unit_of_measurement: A
    accuracy_decimals: 3
    state_class: "measurement"
    device_class: "current"
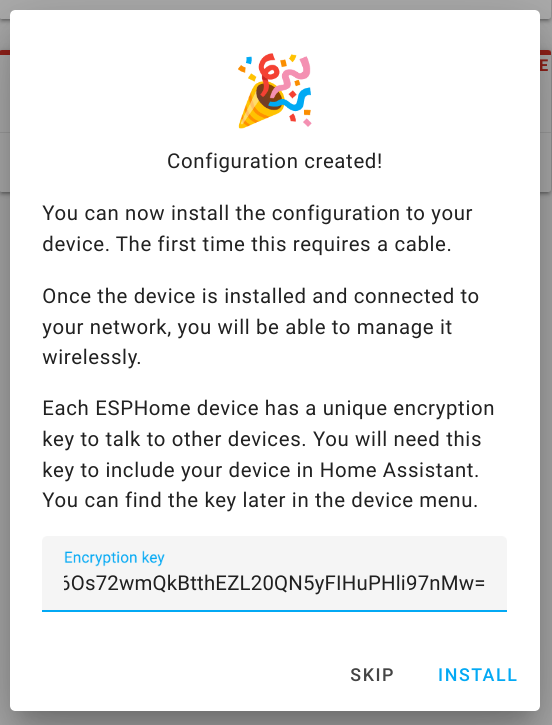
Efter att vi gjort detta ska vi generera ut en fil som vi kan ladda upp till våran ESP. Då trycker du på Install längst upp till höger och väljer Manual Download och sedan väljer Modern format. Då kommer det upp en ruta som visar allt som den kompilerar och när den är klar ska det finnas en fil att ladda hem som slutar på .bin.
Koppla upp P1-Reader
Första gången så ska det finnas en för flashad version så man kan göra en installation utan att koppla in den fysiskt utan man kan göra en manuell OTA installation. Koppla in den till mätaren och se om du hittar ett Wifi-nätverk som heter “Grunna P1Reader”. Du ska ha fått ett lösenord som ska funka till wifit. Datorn eller mobilen kan säga att den vill logga in när den anslutit sig. Om den inte gör det öppna en webbläsare och gå till “http://192.168.4.1/”.
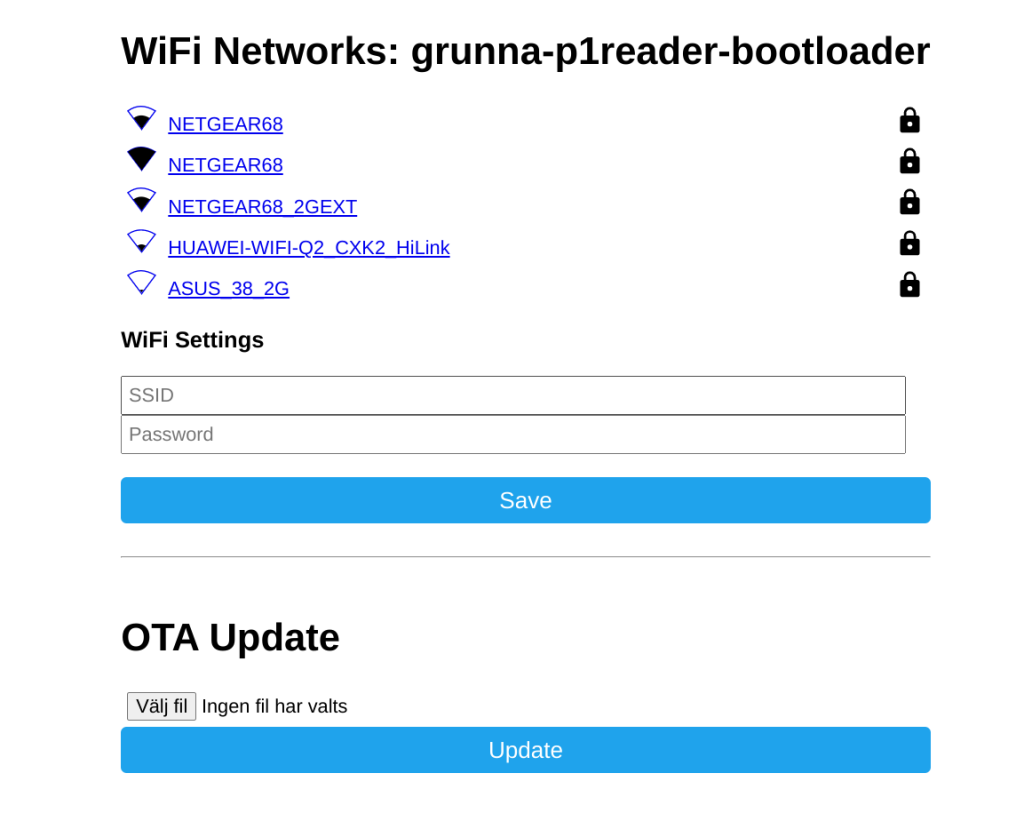
Det borde se ut såhär när du loggar in. Gå till “Välj fil” och välj filen du genererade från ESPHome och ladda upp den. Efter det borde du få in data till HA. Efter det kan man uppdatera allt från HA och välja wireless utan att man behöver generera några nya filer om man skulle behöva göra några uppdateringar eller förändringar.

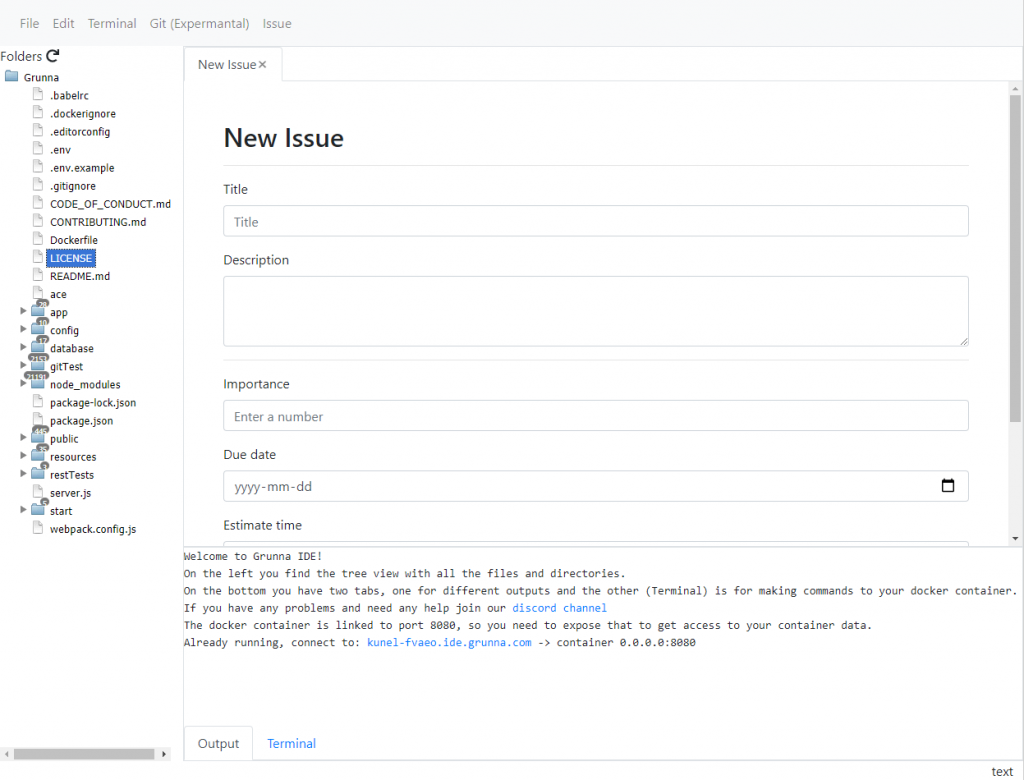
Dev update – Handle issues
It is now possible to handle all your issues in GrunnaIDE. You do not need to have a separate place to keep what need to be done. This is a very easy issue handler and should be continued to be developed later on. I just needed something simple to have a place what should be done.
It’s not that much but I think it’s the basics to get started. I have some ides that I want to implement later on. One is that you can create an issue from the code and get a reference in the issue to the specific place so you can easy go to the place we know where it is a problem, or if you have a test case that fails.
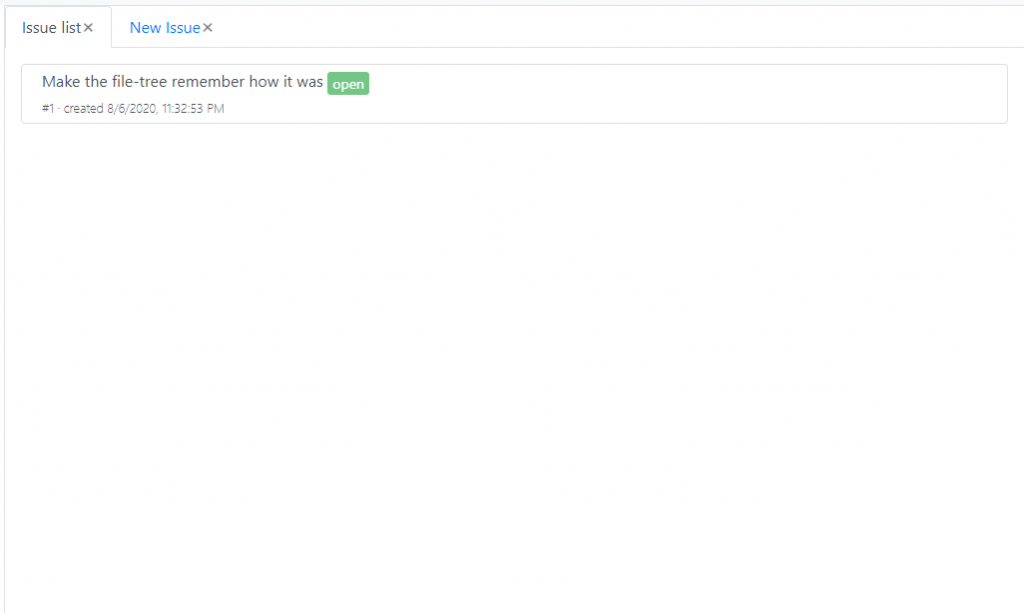
This will be the list that show all the issues. At the moment I show both open and closed issues. I want to split that later on. I think I need to have a pageinator later on also.
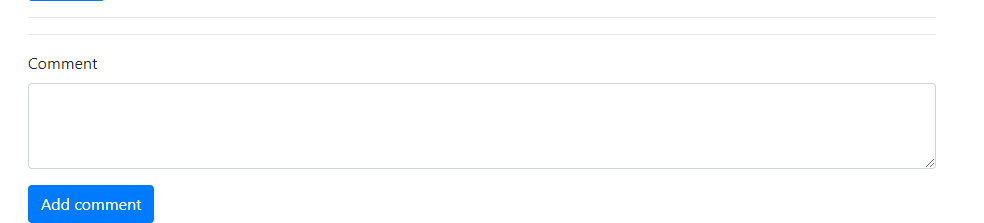
There is a simple comment part so we can have a discussion what should be done or if there is question about the issue.
That is it for now. Next thing I’m looking to extend the editor to have a visual part to code with a visual part. Drag and drop coding. Lets see how that will go.
Go try the new feature at https://ide.grunna.com/login and any question or suggestion for improvement go to https://discord.gg/Hzf6hC

Dev update – Setup Phaser
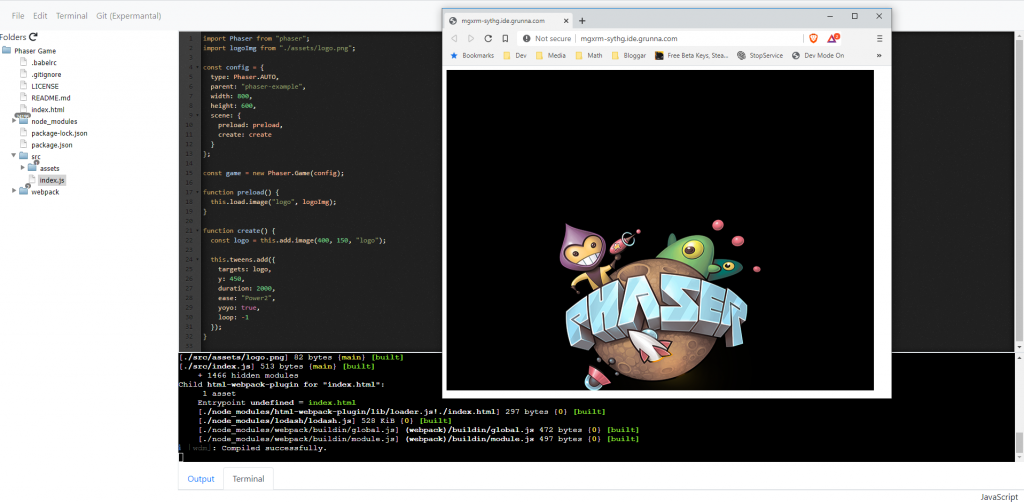
Today I will talk about how to get Phaser up and running in a easy way in Grunna IDE.
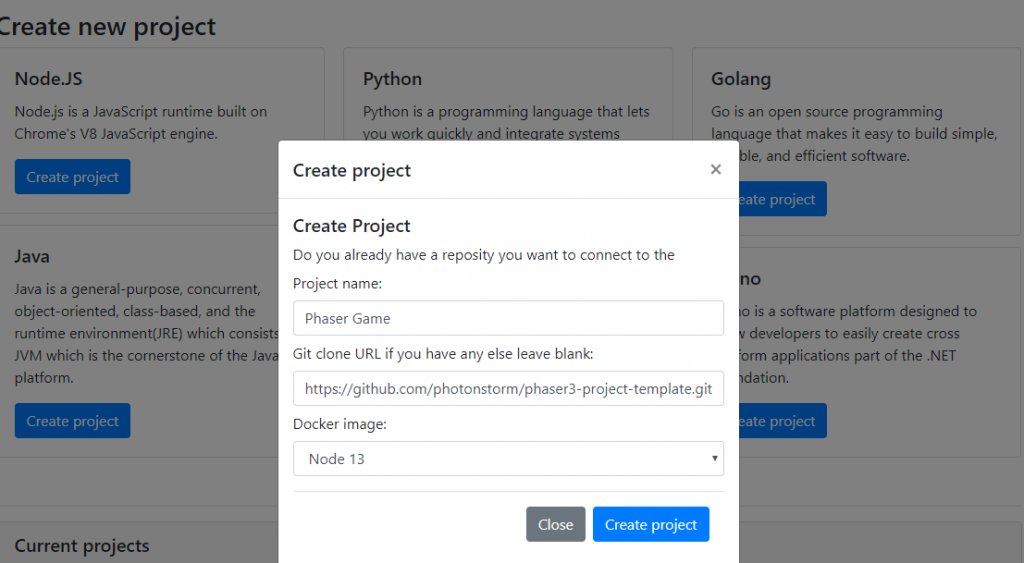
First you need to login on https://ide.grunna.com via a GitHub account. When you have logged in and your on your dashboard you can create a new project. You will need to create a node project and clone this git repo from Phaser ‘https://github.com/photonstorm/phaser3-project-template.git’.
This will create the project and a docker container will be created for you. In the bottom you will get the URL for access it, this will be renewed every time you login or refresh the page. In the container you also need to run on port 8080. Because it is in a container we need to change some more in the package file to get it working. Open up the package.json and locate this part. "start": "webpack-dev-server --config webpack/base.js --open" we need to add two more parameters. It should be change to "start": "webpack-dev-server --config webpack/base.js --open --host 0.0.0.0 --disable-host-check" and hit the CTRL-S to save the changes.
When that is done you go to the bottom and press the terminal tab and press enter once to get into it. Then you have to install all the dependency and you do that with npm install, when that is finished you are good to go and start the server with npm start. This will start the server and it should update every time you save so you don’t need to restart the server. You need however reload the page to get the new update.
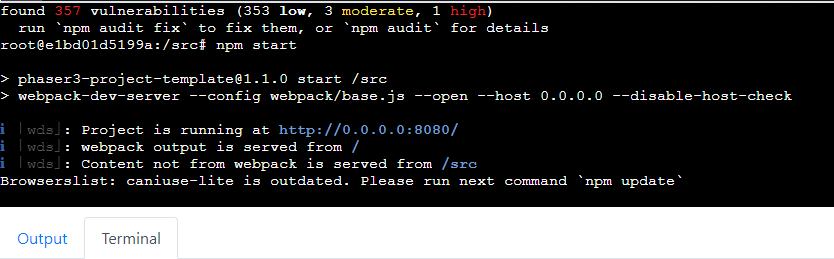
Just get back to the Output tab and press the link to get into the game. It is that easy to get a server up and running and start coding your own game in phaser.
If you have any question or need any help just join our Discord and we will help you as good as we can.
Develop update 4
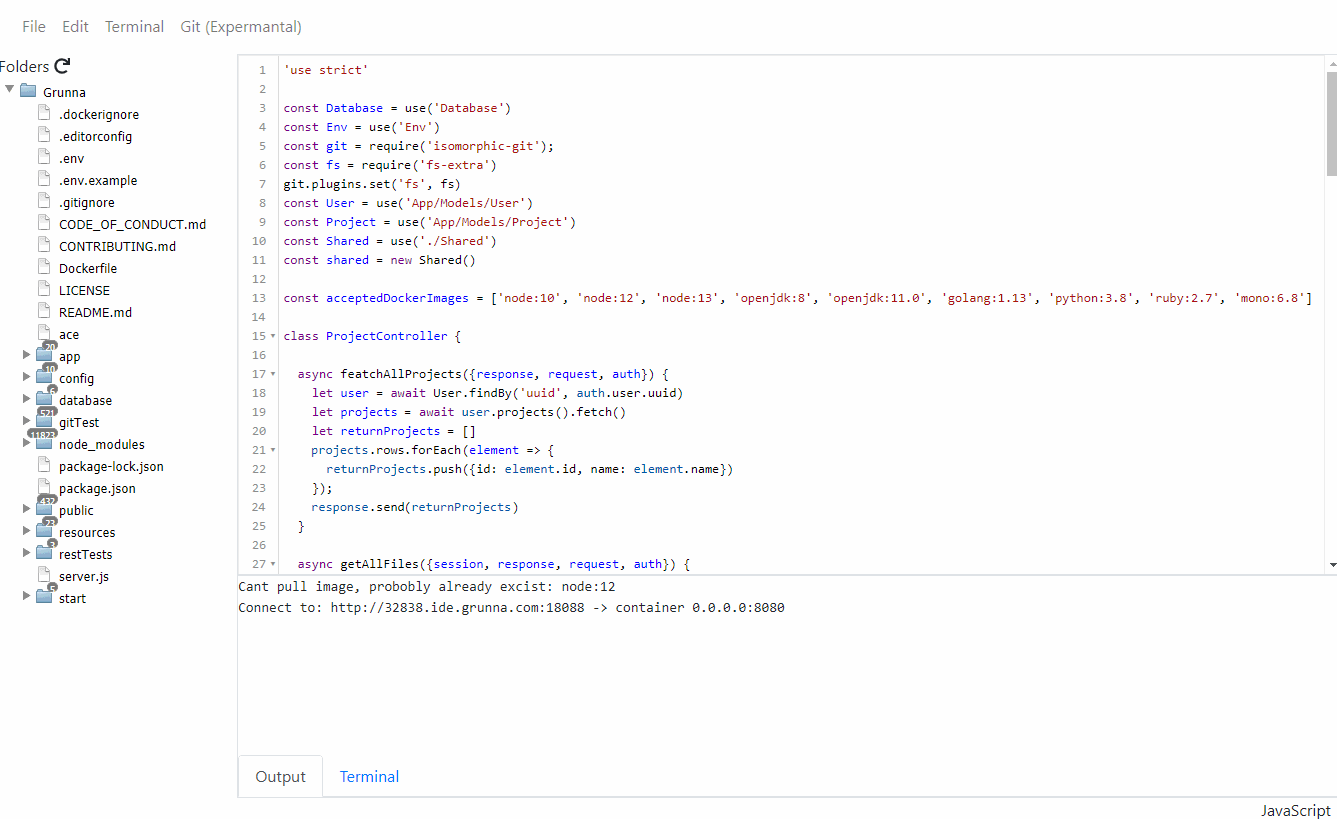
I have finally finished the first version of the IDE. This is a big step in my mile stone. I have a functional WebIDE that is usable. At the moment I code everything in my IDE to improve it. So I can tackle the part I hate the most. So is there something I don’t like I need to fix it and then I go to the next part and repeat. At the moment I have an IDE that can load files. Highlight the code in different languages and have some code help but very limited. You can search for files but not in files and you can only have one file open at a time. All projects are linked to a docker instance and you are free to use that one. At the moment they are very open but I will probably close them down even further for modification.
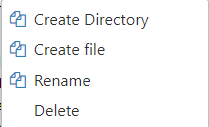
The issues I finished this week was the ability to rename files and move them if you wanted.
I have also fixed a bug when I moved the creating a new projekt from a private repo to dashboard. So you should now be able to do that to and I have added the ability in backend to keep the same name on the URL when you reconnect to the IDE so you don’t need to change the name very time you lose the connection or getting back the next day. I will change to something else here so I use the docker name instead of a number.
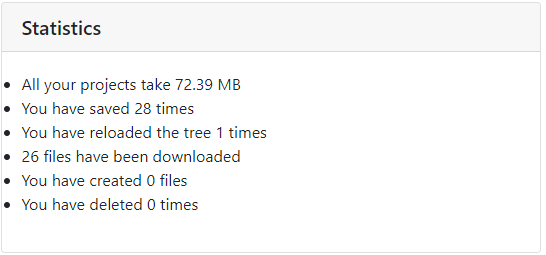
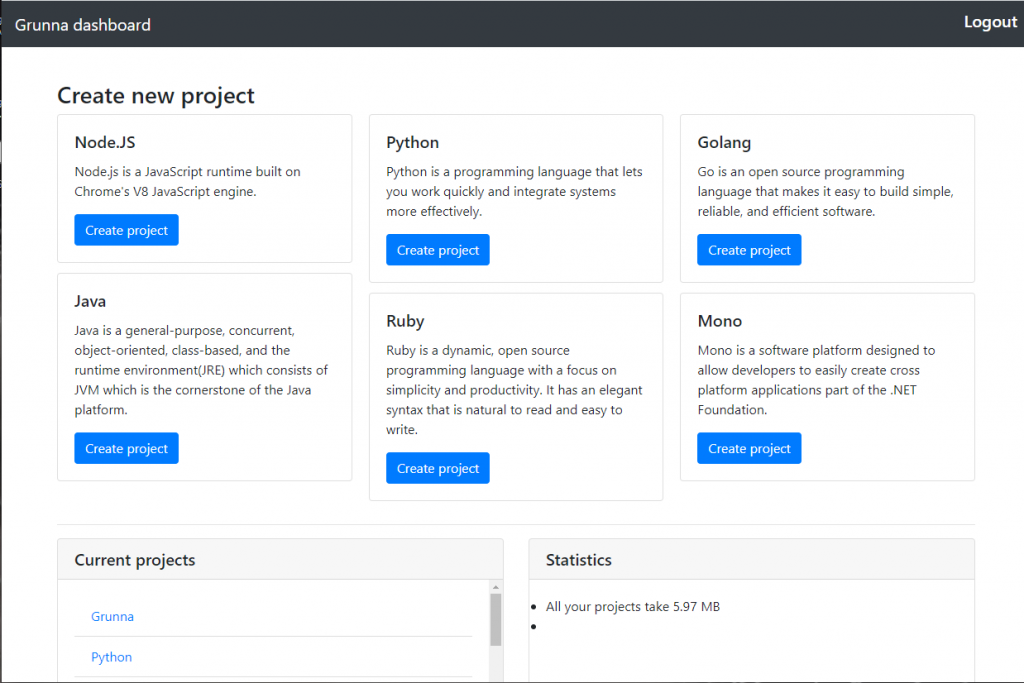
I have made it very easy to track statistics also and have started to display some of it on the dashboard.
Now I need to set a clear goal for milestone 2 and see how I can get there. At the moment I have only tried to get something up and running and I have finished that so now I need to change focus. Maybe it will just be a small milestone with a lot of polish stuff and just make the IDE look better without much improved features.

Development update 3
It have been a very slow week and it feels that I haven’t been doing much at all but this week have been focused on getting the dashboard ready. I have done a very simple one and later I want to have some kind of template where you can have a good starting point for different languages. I have some thoughts to first focus on different game templates but that will be for the next face in the development. I have looked into save different statistics and that will be presented on the dashboard. It will be from how much data you have to have many times you have hit the save button. I will continue to see what I can save.
I found out the drawbacks to use a CDN. I was about to do some coding today to get the last things done with the statistics on the dashboard. Unfortunately a few libraries couldn’t get delivered so the entire site was unusable and I don’t know when I can use it again. I have on my to do list to change over to npm and build my own bundle. I think that a React/Vue framework are to big when I only have more or less one page that is the editor. But I need to rewrite the front end because that is just patch together to get something up and running to see if the back end is working. I guess I will prioritize this some higher after this problem. But then again I can write the front end code more like I want it.
That’s it for this week, Happy Coding All!

Development update 2
This last week feels that not much have been made. There are very few issues that have been done but on the other hand the one I work on are bigger and important to get working. I also found a problem with my setup in docker. I realized that all my containers have access to my local lan so I had to sit down and read up on docker network and iptables to prevent the containers to be able to talk to other parts in my network.
The first issue I fixed was the search for files. I see that I have to create a new issue about scrolling all the files that is being displayed and not only the first once. But I’m very pleased how it turned out. You can search for files by typing CTRL+P.
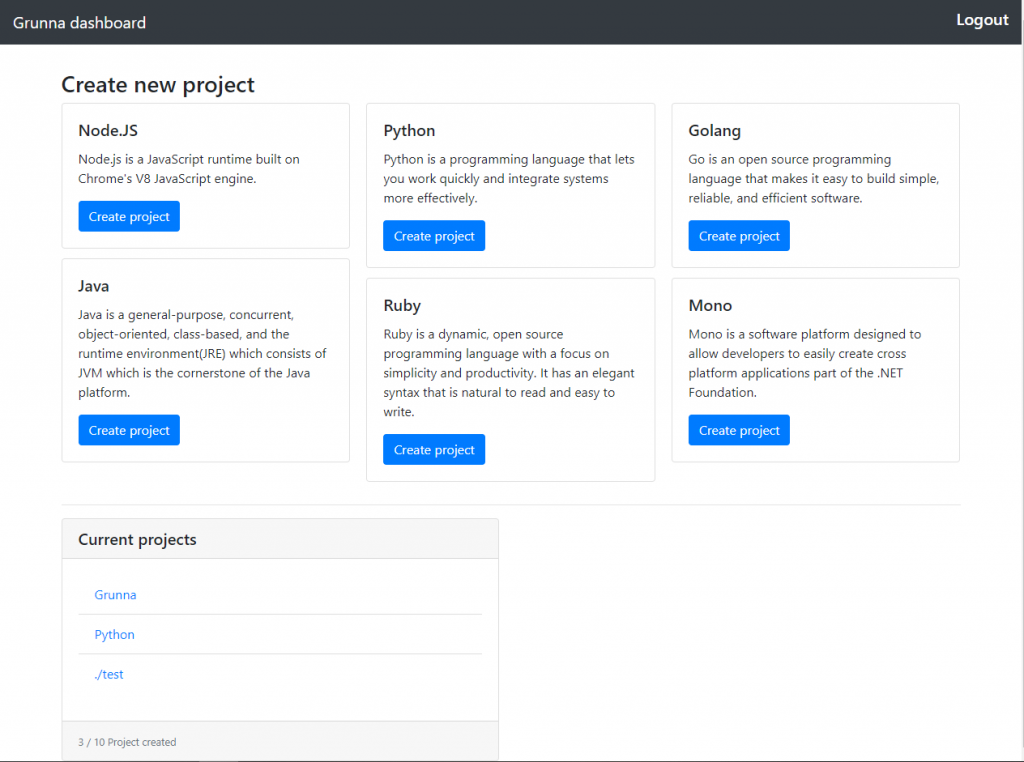
The thing I’m working on right now is a dashboard that will be the landing place for when you login and the go to place for creating and open new project. I will keep all the settings for the account here also. But at the moment I just need something to start with so I can build upon it. I have some thoughts to add the create project that will download finished template projects. But the dashboard start to look ok.
That’s all for this week. I hope to finish the first version this week that is coming if I don’t hit any big things. Happy coding all

Development update 1
I will try to write some every week what the progress with the IDE is and why I have taken some of the decisions. At the moment I only want to focus on a functional version that you can work in. It will have a lot of small problem that you can live with. So I focus on the bigger things. One of the critical things I fixed was the redirect if your not logged in. So you always get to the login page. Something that have bugged me a long time so feels good to finally fixed that one.
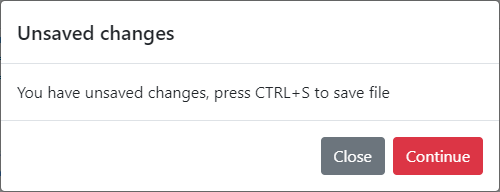
Another one that wasn’t top prio was the warning when you navigate away from a file that is modified but not saved. You just had to retype everything you done but nothing major. I now how a dialog that warns you about that. I will update the dialog with a save and continue later on, or this will be irrelevant when I start to use tabs for all the files.
Another very risky button I had was the remove project. It was removing the project without asking for confirmation. This is now fixed. Maybe I need something more so you don’t accidentally remove your project.
From the beginning I had a requirement that you needed a git repository tied to your project so you was forced to have some way to update your code. This is now dropped and you can create projects just to test something that isn’t tied to any repository.
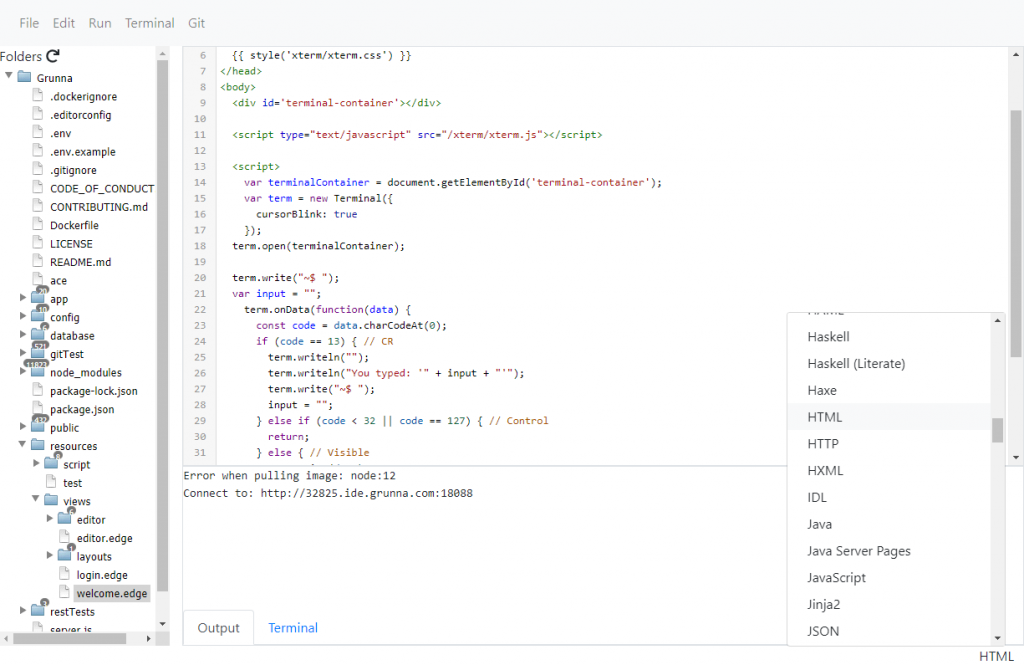
And lastly I have finally added the change of the mode manually. This makes it possible if Codemirror can’t understand what kind of file it is, to pick the correct one your self. You do that by clicking the button on the bottom right. So for the example you see bellow the .edge file the editor don’t know what it is but then I can just change it to HTML. It would be good if you can always associate one kind of extension to a mode and you don’t need to pick it every time. But that is for the next version.
The next 7 days will be focus on search for files, so you can search for a file and open that one up in the editor. I guess I will just make a simple dialog with a search field and a few files that correspond with the search. This will need to be built on later. Then I need to have a nicer first page when you login where you can see all your recent project and status about your account. Nicer selection to create a new project. So that will be the main focus now.

Quest to first version
When I started this project I wanted to learn more about docker but I have always also wanted to make my own IDE. One of the big challenge when doing an IDE is to get it as fast as possible so it feels as fluid as possible when you work. There are already a lot of good IDE so to see the small progress I make in my own I started to code via an SSH terminal to my server with a basic editor so I would go to my own IDE as soon as I get it to work. That was the thought at least and it have worked well. I just tried to get the basic finished so I could move away from the terminal.
I have looked at NodeJS for a long time and wanted to give that a shot for a bigger project. I was looking for a framework that helped me and I choose AdonisJS. For me it help with all the things I needed. The problem with this framework is that it is more or less only one person that is working with it so it can be ended without anyone continue. The documentation is ok and works for me and the framework help me with the part I have problem with and need. I have a simple SQL as DB and I wanted to work with Sockets also so I use that also. The frontend I wanted to learn with less frameworks and with plain javascript so that is what I have focused on.
The first I focused on was to get the login to work so I can have different users. Then I focused on the docker to be able to run the code in a separate container per user. After that I need to be able to fork code from git so that was the next thing. I also needed to be able to handle multiple projects per user so that was the next thing. I needed to get the frontend to work with the backend. So I needed to balance the two. In the beginning I focused more on the backend.
The very first “working” site I hade a tree view that could download the file and then I used a textarea to display and change code. The command to docker I used a text field and a textarea that was read only to display information from docker. This isn’t very effective but it was better then what I had before. So for me it was a step up. Then it was just see what I had most problem with and fix that part. I have change my textarea with code to codemirror to display the code. The docker is now using xtermjs. This is where I stand at the moment and I just want to fix some small parts and I think a first working version is done. After that it will be adding and refactoring in small chunks to get a better IDE step by step.
I hope you find this informative.